Author: alex

  • Grandmother’s Classic Ground Beef Casserole

    Grandmother’s Classic Ground Beef Casserole

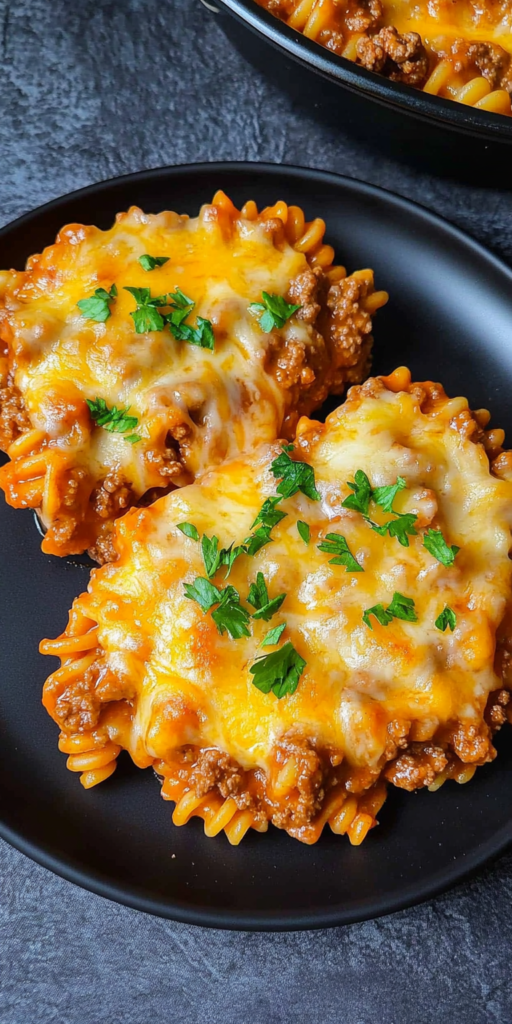
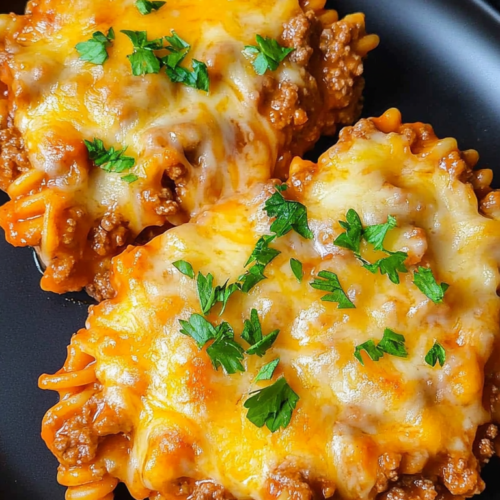
    Grandma’s ground beef casserole is a nostalgic, comforting dish that blends tender noodles, hearty beef, and rich tomato sauce, all crowned with bubbling cheddar cheese. Perfect for busy weeknights or casual gatherings, this dish is simple, satisfying, and full of homestyle flavor.

    With just a few pantry staples, Grandma’s ground beef casserole comes together quickly and easily, filling your kitchen with a mouthwatering aroma that’s impossible to resist. This classic comfort meal is hearty enough to feed a crowd and perfect for freezing too!

    Star Ingredients for Grandma’s Ground Beef Casserole

    • Egg noodles or short pasta – The foundation of the casserole, offering a tender, chewy texture that soaks up the sauce.
    • Ground beef – Adds savory depth and hearty richness, making the dish filling and satisfying.
    • Onion – Provides a subtle sweetness and aromatic flavor to balance the richness of the beef.
    • Green bell pepper – Brings a fresh, slightly sweet crunch that complements the other hearty ingredients.
    • Tomato sauce – Creates a rich, tangy base that ties all the flavors together into one delicious sauce.
    • Cream cheese – Adds luscious creaminess, giving the casserole an irresistible, velvety texture.
    • Sharp Cheddar cheese – Melts to golden perfection on top, delivering sharp, salty goodness in every bite.

    How to Whip Up Grandma’s Ground Beef Casserole

    Begin by cooking your noodles just until al dente and setting them aside. In a large skillet, brown the ground beef in olive oil, breaking it into crumbles as it cooks. Toss in the diced onions and green bell peppers, sautéing until they soften.

    Season the beef mixture with garlic granules, salt, and pepper, then pour in the tomato sauce, letting it simmer to deepen the flavors. Stir in the softened cream cheese until the sauce becomes rich and creamy.

    Layer the cooked noodles into a greased baking dish, then pour the hearty meat sauce over the top, spreading it evenly. Finish by sprinkling a generous layer of sharp Cheddar cheese. Bake in a preheated oven until the cheese is melted and bubbly, then let the casserole rest before serving.

    Cozy Tips for the Perfect Grandma’s Ground Beef Casserole

    For an even richer casserole, swap half the tomato sauce with a can of diced tomatoes for added texture. If you love a little kick, stir a pinch of crushed red pepper flakes into the beef mixture. Want a veggie boost? Fold in some spinach or mushrooms just before layering.

    Choosing a sharper Cheddar will give the topping an extra punch of flavor, and letting the casserole rest after baking ensures clean slices and more defined layers.

    How to Store and Reheat This Homestyle Favorite

    Leftovers of Grandma’s ground beef casserole are pure gold! Cool the casserole completely before transferring it to an airtight container. It will stay fresh in the refrigerator for up to 4 days.

    For longer storage, freeze individual portions wrapped tightly for up to 3 months. Reheat in the oven at 350°F until warmed through, or microwave on medium power for a quick, cozy meal.

    Would you like me to suggest a few side dishes that would pair beautifully with this casserole too?

    Grandmother’s Classic Ground Beef Casserole

    This classic, homestyle ground beef casserole mirrors the cherished recipe made by Grandma, offering a hearty, comforting meal that’s straightforward to prepare and perfect for serving a hungry crowd with minimal ingredients.
    Prep Time 10 minutes
    Cook Time 45 minutes
    Total Time 55 minutes

    Ingredients
      

    • ½ teaspoon garlic granules
    • 2 15-ounce cans tomato sauce
    • 1 medium green bell pepper diced
    • 1 tablespoon olive oil
    • ¼ teaspoon ground black pepper
    • 1 pound ground beef
    • 4 ounces cream cheese softened
    • 1 pound egg noodles or short pasta
    • ½ teaspoon salt
    • 1 medium onion diced
    • 1 ½ cups sharp Cheddar cheese shredded

    Instructions
     

    • Set the oven to preheat at 350°F. Boil the egg noodles or short pasta following the package directions until just tender, drain thoroughly, and set aside. In a spacious skillet over medium heat, warm the olive oil, then add the ground beef, breaking it into small crumbles as it cooks until no longer pink. Incorporate the diced onion and green bell pepper into the skillet, cooking for about 4–5 minutes until the vegetables soften. Mix in the garlic granules, salt, and ground black pepper, stirring well to season. Add the tomato sauce, stir to combine, and allow the mixture to reach a simmer, letting it bubble gently for a few minutes. Blend the softened cream cheese into the sauce, ensuring it melts fully and the sauce is creamy. Lightly grease a 9×13-inch baking dish with cooking spray, then lay the cooked noodles evenly across the bottom. Spoon the meat sauce over the noodles, spreading it out to cover them completely. Sprinkle the shredded sharp Cheddar cheese evenly over the top. Transfer the baking dish to the preheated oven and bake for 20–25 minutes, or until the cheese is melted, bubbling, and lightly golden. Allow the casserole to cool slightly before serving warm.
  • White Chocolate Caramel Pecan Fudge

    White Chocolate Caramel Pecan Fudge

    White Chocolate Caramel Pecan Fudge is the ultimate indulgence, combining rich white chocolate, buttery pecans, and luscious caramel in every bite. This irresistible treat is a perfect addition to any dessert table.

    Easy to prepare and even easier to love, White Chocolate Caramel Pecan Fudge offers a creamy, dreamy texture with a delightful crunch. It’s a simple yet luxurious sweet you’ll crave all year long.

    Must-Have Ingredients for White Chocolate Caramel Pecan Fudge

    • Sweetened condensed milk – Adds a creamy, sweet richness that binds the fudge together beautifully.
    • White chocolate chips – Provide the velvety, smooth base flavor essential to this fudge’s luxurious taste.
    • Butter – Infuses a deep, rich flavor while helping to create that irresistible melt-in-your-mouth texture.
    • Vanilla extract – Enhances all the other flavors, giving the fudge a fragrant, warm depth.
    • Pecans – Offer a buttery, crunchy contrast that perfectly balances the silky fudge.
    • Caramel sauce – Swirled into the fudge, it brings a decadent, gooey sweetness that makes each bite unforgettable.

    How to Create White Chocolate Caramel Pecan Fudge

    Start by combining white chocolate chips, butter, vanilla, and sweetened condensed milk in a microwave-safe bowl. Heat in 30-second bursts, stirring thoroughly after each cycle, then switch to 15-second intervals until smooth.

    Once melted, stir in the chopped pecans gently. Line a baking dish with parchment paper and pour the fudge mixture in, smoothing it out evenly to about an inch thick or your preferred depth.

    Drizzle the caramel sauce generously over the top. Using a knife, swirl through the caramel and fudge to create a beautiful marble effect.

    Chill the fudge in the refrigerator until it’s firm. Once set, cut into one-inch squares and savor the sweet, buttery goodness!

    Tips and Sweet Twists for the Perfect White Chocolate Caramel Pecan Fudge

    For an extra luxurious touch, toast the pecans lightly before folding them into the fudge. This simple step deepens their nutty flavor and adds a lovely crunch. If you love a salty-sweet combination, sprinkle a little sea salt over the top before chilling.

    Feeling creative? Swap out pecans for walnuts or macadamia nuts, or add a few mini marshmallows for a playful, chewy texture. Dark chocolate caramel drizzle could also create an irresistible twist for those who crave deeper chocolate notes.

    Storing Your White Chocolate Caramel Pecan Fudge the Right Way

    Keep your White Chocolate Caramel Pecan Fudge fresh by storing it in an airtight container in the refrigerator. It will stay delicious for up to two weeks. For longer storage, wrap pieces individually in parchment paper and freeze them for up to three months. When ready to enjoy, thaw at room temperature for the best flavor and texture.

    Would you like a printable version of this recipe formatted for easy kitchen use?

    White Chocolate Caramel Pecan Fudge

    A luxurious and indulgent treat, this white chocolate caramel pecan fudge combines creamy textures and rich flavors into perfect bite-sized squares. Swift to prepare yet elegantly delightful, it is ideal for any festive gathering or simple sweet craving.
    Prep Time 10 minutes
    Cook Time 10 minutes
    Total Time 20 minutes

    Ingredients
      

    • 4 tablespoons butter
    • ¾ cup caramel sauce room temperature
    • 1 can 14 ounces sweetened condensed milk
    • ½ teaspoon vanilla extract
    • 1 cup chopped pecans
    • 1 bag white chocolate chips

    Instructions
     

    • In a medium mixing bowl, combine the white chocolate chips, butter, vanilla extract, and sweetened condensed milk. Microwave the mixture in 30-second intervals, stirring thoroughly after each session to ensure even melting. Shift to 15-second bursts as needed, stirring diligently between each heating, until the chocolate becomes fully melted and silky smooth. Withdraw the bowl from the microwave and immediately incorporate the chopped pecans, mixing well to evenly distribute. Prepare a baking dish by lining it neatly with parchment paper. Transfer the melted fudge mixture into the lined dish, smoothing it out to an even thickness of about one inch or as desired. Generously drizzle the room-temperature caramel sauce over the top of the fudge. Using a knife, gently swirl through the caramel and chocolate to create an elegant marbled effect. Place the baking dish in the refrigerator and allow the fudge to chill thoroughly until fully set. Once firm, slice into one-inch squares and serve.

    Notes

    Store fudge in an airtight container in the refrigerator for maximum freshness. Allow to sit at room temperature briefly before serving for the best texture.
  • Southern Salmon Patties

    Southern Salmon Patties

    Bring a touch of nostalgia to your table with Easy Southern Salmon Patties, the golden, crispy comfort food that’s a true Southern staple. Easy Southern Salmon Patties are packed with savory salmon, bright green onions, and just the right kick of seasoning for a crowd-pleasing dish.

    Perfect for busy weeknights or Sunday family dinners, this recipe delivers mouthwatering flavor in every tender bite. Whether fried or baked, these patties will quickly become a favorite at your table.

    Must-Have Ingredients for Easy Southern Salmon Patties

    • Pink salmon (18 ounces) – The heart of the recipe, providing rich, flaky texture and savory seafood flavor.
    • Real mayonnaise (½ cup) – Adds creaminess and helps bind the patties together while keeping them moist.
    • Lemon juice (from ½ medium lemon) – Brightens the flavor and cuts through the richness of the salmon and mayonnaise.
    • Large egg (beaten) – Essential for binding the ingredients into cohesive patties that hold their shape.
    • Green onions (½ cup, finely chopped) – Bring a fresh, peppery crunch that lifts the entire flavor profile.
    • Worcestershire sauce (½ teaspoon) – Introduces a deep, umami undertone that complements the salmon beautifully.
    • Creole seasoning or Old Bay (½ teaspoon) – Infuses the patties with a subtle Southern spice and depth.
    • Salt (¼ teaspoon) – Enhances all the natural flavors without overpowering the dish.
    • Coarse ground black pepper (¼ teaspoon) – Adds a mild, warm bite to balance the creamy ingredients.
    • Saltine crackers (about 30, divided) – Provide a tender-crisp texture inside and a crunchy, golden exterior.

    How to Make Easy Southern Salmon Patties

    A Simple Walkthrough to Deliciousness

    Start by heating about an inch of oil in a cast iron skillet over medium heat until it’s hot enough that a sprinkle of water crackles. While the oil heats, mix the salmon, mayonnaise, lemon juice, beaten egg, and Worcestershire sauce in a large bowl.

    Fold in the chopped green onions, Creole seasoning, salt, and pepper, mixing thoroughly. Crush about half of the saltine crackers and stir them into the salmon mixture until evenly distributed.

    Finely crush the remaining crackers and spread them out on a plate. Shape the salmon mixture into small to medium patties, gently pressing each into the cracker crumbs to coat all sides.

    Carefully place the patties into the hot oil, frying for 2–3 minutes per side until beautifully golden brown. Drain on a rack lined with paper towels and serve while still warm.

    Pro Tips & Flavor Twists for the Best Salmon Patties

    For the crispiest patties, avoid overcrowding the pan so the oil temperature stays consistent. If you prefer a lighter version, these patties bake wonderfully at 400°F on a parchment-lined sheet until crisp, flipping halfway.

    A dash of hot sauce mixed into the salmon batter adds an exciting heat, while substituting dill for green onions gives a fresh, herbal twist. For a low-carb variation, swap crushed pork rinds for the crackers.

    How to Store and Reheat Southern Salmon Patties

    To keep leftovers tasting fresh, store cooled salmon patties in an airtight container in the refrigerator for up to three days. Reheat them in a 350°F oven for about 10 minutes to restore their crispness.

    For longer storage, freeze cooked patties separated by parchment paper in a freezer-safe bag. Reheat directly from frozen in a 375°F oven until hot and crispy, about 15–20 minutes.

    Southern Salmon Patties

    Experience the quintessential taste of the South with these easy-to-prepare salmon patties. Crispy on the outside yet tender and flavorful within, they embody the essence of cherished family gatherings and home-cooked tradition. Whether fried or baked, these golden patties are sure to become a household favorite.
    Prep Time 10 minutes
    Cook Time 15 minutes
    Total Time 25 minutes

    Ingredients
      

    • ½ teaspoon Worcestershire sauce
    • ½ teaspoon all-purpose Creole seasoning or Old Bay
    • ¼ teaspoon coarse ground black pepper
    • 18 ounces pink salmon
    • ½ cup real mayonnaise
    • ¼ teaspoon salt
    • juice from ½ medium lemon
    • about 30 saltine crackers divided
    • ½ cup finely chopped green onions approximately 5–6 green onions
    • 1 large egg beaten

    Instructions
     

    • Pour cooking oil into a 12-inch cast iron skillet to a depth of about 1 inch and heat over medium flame until a sprinkle of water crackles on the surface, indicating readiness for frying. In the meantime, in a large mixing bowl, thoroughly combine the salmon, mayonnaise, lemon juice, beaten egg, and Worcestershire sauce. Incorporate the green onions, Creole seasoning, salt, and black pepper, mixing well to ensure even distribution. Crush 13–15 of the saltine crackers and fold them into the salmon mixture, stirring until fully integrated. Place the remaining crackers on a small plate and finely crush them to create a dredging layer. Shape the salmon mixture into small to medium-sized patties with your hands, then gently coat each patty in the finely crushed crackers, pressing lightly to adhere on all sides. Carefully lower the patties into the hot oil, frying each for 2–3 minutes per side or until they achieve a golden-brown crust. Remove the cooked patties and set them on a baking rack lined with paper towels to drain excess oil. Serve immediately while warm.

    Notes

    For a lighter option, these patties may also be baked in a preheated oven until golden and cooked through.
  • Kilted Sausage Bites

    Kilted Sausage Bites

    Kilted Sausage Bites are a crowd-pleasing appetizer perfect for parties, game days, or casual gatherings. Featuring smoky sausage wrapped in buttery crescent dough, they deliver bite-sized satisfaction in every mouthful.

    This savory treat combines melty cheeses, poppy seeds, and a flavorful buttery glaze for an irresistible finish. Whether dipped in mustard or ketchup, Kilted Sausage Bites are guaranteed to vanish fast from the table.

    Star Ingredients for Kilted Sausage Bites

    • Crescent roll dough – Acts as the buttery, flaky outer layer that hugs each piece of sausage beautifully.
    • Kielbasa or smoked sausages – The hearty, smoky centerpiece that brings depth and bold flavor to every bite.
    • Shredded cheese – Melts into a gooey, savory layer that enhances the sausage’s richness.
    • Cream cheese – Adds a creamy, tangy contrast to the sharper flavors of sausage and shredded cheese.
    • Poppy seeds – Lend a subtle nuttiness and charming visual texture to the finished bites.
    • Butter – The base of the rich, golden glaze that crisps and flavors the dough.
    • Dijon mustard – Infuses the glaze with a zesty sharpness that cuts through the richness.
    • Brown sugar – Balances the glaze with a touch of sweetness.
    • Worcestershire sauce – Adds umami depth, giving the glaze a savory backbone.

    How to Make Kilted Sausage Bites

    Start by preheating your oven and preparing a baking sheet. Roll out the crescent dough and patch any seams to create a smooth surface.

    For the first roll, sprinkle shredded cheese generously over the dough before wrapping the sausage tightly. For the second, spread a luscious layer of cream cheese before rolling up. Slice each roll into bite-sized rounds and arrange them neatly on your baking sheet.

    Whisk together the glaze ingredients and brush each piece liberally before sprinkling with poppy seeds. Bake until golden brown and crispy, then serve warm with your favorite dips for a guaranteed hit!

    Top Tips for Perfect Kilted Sausage Bites

    For best results, ensure the dough is well-sealed around the sausage to prevent any cheese from leaking out during baking. You can easily customize the filling—swap in pepper jack for a spicy kick or add a sprinkle of garlic powder for extra flavor.

    If you prefer a less sweet glaze, reduce the brown sugar slightly or replace it with honey for a floral touch. Always use a sharp knife to slice the rolls cleanly, helping each bite stay neat and even while baking.

    Storing and Reheating Kilted Sausage Bites

    To keep Kilted Sausage Bites fresh, store them in an airtight container in the refrigerator for up to three days. Reheat in a 350°F oven for 5-7 minutes until warmed through and crisp again—avoid microwaving, as it can make the dough soggy.

    For longer storage, freeze the unbaked slices on a tray until solid, then transfer to a freezer bag. When ready to bake, brush with glaze and pop them straight into the oven, adding a couple of extra minutes to the bake time.

    Kilted Sausage Bites

    Delightful and savory, these Kilted Sausage Bites offer a perfect combination of flaky pastry, rich cheeses, and flavorful sausage, finished with a buttery glaze for an irresistible appetizer.
    Prep Time 10 minutes
    Cook Time 18 minutes
    Total Time 28 minutes

    Ingredients
      

    • 1 cup shredded cheese
    • 2 teaspoons poppy seeds
    • cup butter melted
    • 2 8 oz crescent roll dough sheets
    • 1 tablespoon brown sugar
    • 2 12 oz kielbasa or smoked sausages
    • 4 oz cream cheese
    • 1 tablespoon Dijon mustard
    • 1 teaspoon Worcestershire sauce

    Instructions
     

    • Preheat the oven to 400°F and lightly coat a large baking sheet with non-stick spray. Unroll one package of crescent roll dough, pressing the seams together to create a smooth, single sheet. Evenly distribute the shredded cheese over the first sheet, positioning one sausage along the long edge; if the sausage curves, cut it in half for easier rolling. Tightly roll the dough around the sausage and pinch the seam to seal securely. Proceed by repeating the same process with the second crescent dough sheet, this time spreading cream cheese over half the dough surface instead of shredded cheese before adding the sausage. Slice each roll into approximately ¾-inch thick rounds using a sharp knife and arrange them cut-side down on the prepared baking sheet. In a small mixing bowl, combine the melted butter, Dijon mustard, brown sugar, and Worcestershire sauce, then brush this glaze generously over the tops of each round. Sprinkle the poppy seeds evenly across the bites. Bake in the preheated oven for 15 to 18 minutes, or until the dough turns golden brown and crispy. Serve warm, accompanied by ketchup, mustard, or your preferred dipping sauces.

    Notes

    For best results, serve these bites fresh from the oven while the pastry remains flaky and the cheese is melted.