Category: RECIPES

  • Antipasto Squares

    Antipasto Squares

    Antipasto Squares are the ultimate party appetizer, layering savory deli meats, cheeses, and roasted red peppers between golden crescent rolls. This crowd-pleaser is impossible to resist and incredibly easy to make.

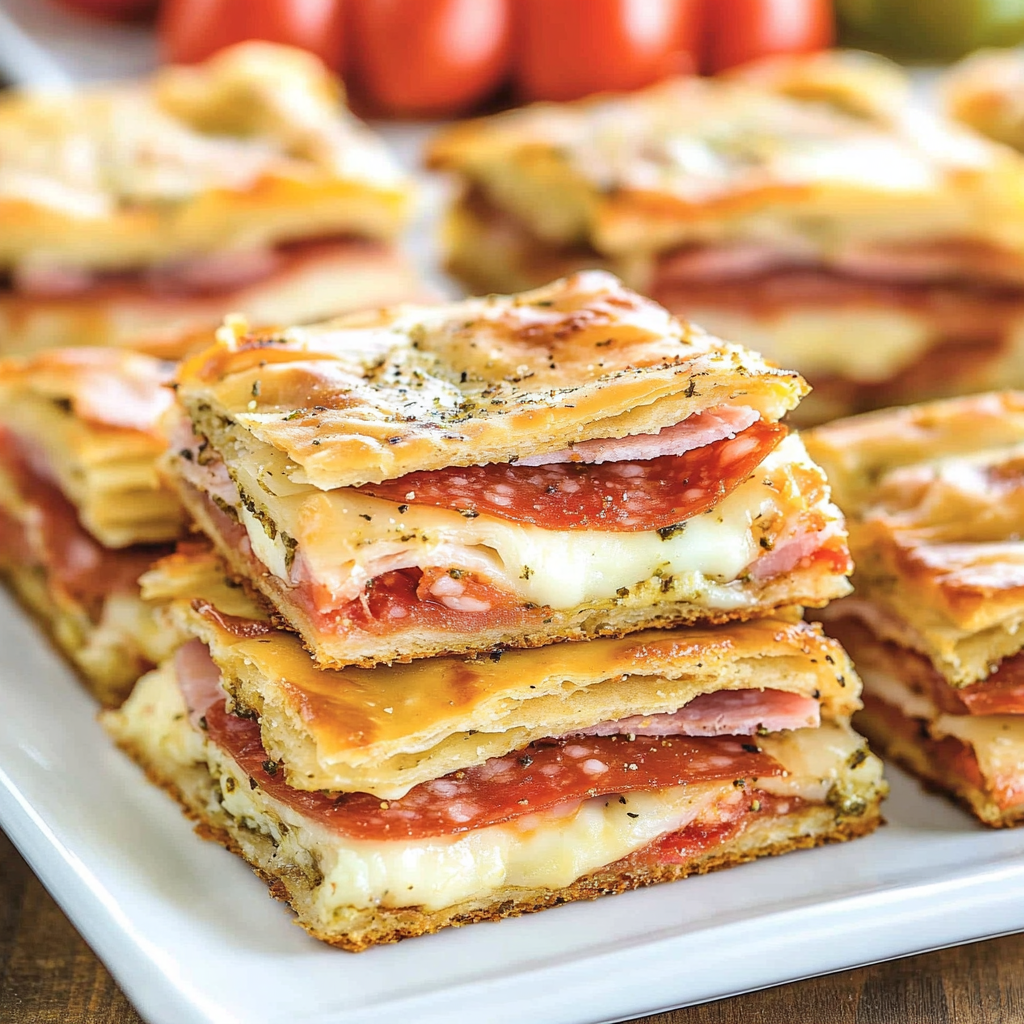
    These warm, cheesy squares are finished with a savory parmesan-egg-pesto topping that bakes into a golden crust. Ideal for potlucks, game days, or holiday spreads, they disappear fast.

    Star Ingredients That Make Antipasto Squares Irresistible

    • Refrigerated crescent rolls – Buttery and flaky, these form the perfect base and top crust for the layered filling.
    • Deli ham – Adds a mild, savory touch that balances out the stronger cured meats.
    • Salami – Brings bold, peppery depth to the filling with a hint of spice.
    • Pepperoni – Adds smoky, zesty richness and a crowd-favorite flavor.
    • Provolone cheese – Melts beautifully with a mellow sharpness that enhances the meat.
    • Swiss cheese – Offers nutty complexity and gooey texture between layers.
    • Roasted red peppers – Bring sweetness and a touch of smokiness for balance.
    • Eggs, parmesan cheese, and pesto – Whisked together, this trio creates a savory topping that bakes into a golden, cheesy finish.

    Let’s Layer It Up: How to Make Antipasto Squares

    Start by pressing one crescent roll sheet into your baking pan as the base.

    Layer the meats and cheeses in order, finishing with vibrant roasted red peppers. Add the second crescent sheet on top and seal the edges.

    Pour a whipped mixture of eggs, parmesan, and pesto over the entire top, cover with foil, and bake. Finish uncovered until beautifully golden and puffed.

    Once cooled slightly, cut into generous squares and serve warm or at room temperature.

    Tips, Swaps & Creative Twists for Antipasto Squares

    Antipasto Squares are as customizable as they are delicious. Switch up the meats with capicola, mortadella, or turkey if you’d like a lighter option. You can also experiment with cheeses—mozzarella or fontina work great for extra meltiness.

    If you love a bit of tang, add banana peppers or sliced pepperoncini for an extra zing. For a Mediterranean flair, try layering in a few olives or marinated artichokes.

    Make sure to drain your roasted red peppers well—excess moisture can make the bottom crust soggy. Pressing the top crescent layer firmly at the edges also helps seal in the goodness.

    Keep ‘Em Fresh: Storing Antipasto Square Leftover

    If you’re lucky enough to have any leftovers, store them in an airtight container in the fridge for up to 3 days. Reheat them in a toaster oven or air fryer for best texture—this keeps the crust crisp.

    They also freeze well! Wrap individual squares tightly in foil or plastic, then place in a freezer bag. Reheat straight from frozen at 350ºF until warmed through.

    Antipasto Squares

    A savory layered pastry dish bursting with deli meats, cheeses, and roasted red peppers, encased in buttery crescent rolls and finished with a rich parmesan-pesto egg wash. A guaranteed crowd-pleaser perfect for gatherings.
    Prep Time 10 minutes
    Cook Time 45 minutes
    Total Time 55 minutes

    Ingredients
      

    • ¼ pound sliced provolone cheese
    • 1 tablespoon basil pesto
    • ¼ pound sliced salami
    • 2 8-ounce cans refrigerated crescent roll dough or sheet
    • 3 large eggs
    • ¼ pound sliced deli ham
    • ¼ pound sliced pepperoni
    • 3 tablespoons grated parmesan cheese
    • 1 12-ounce jar roasted red peppers, drained and sliced into strips
    • ¼ pound sliced Swiss cheese

    Instructions
     

    • Preheat the oven to 350ºF and lightly grease a 9×13-inch baking dish with cooking spray.
    • Unroll one can of crescent dough and press it into the base of the prepared dish, ensuring it evenly covers the bottom.
    • Create successive layers with the ham, Swiss cheese, salami, provolone, pepperoni, and roasted red peppers, spreading each component uniformly.
    • Unroll the second can of crescent dough and carefully place it over the layered ingredients, pinching the seams to seal the top.
    • In a small bowl, thoroughly whisk together the eggs, grated parmesan, and basil pesto. Pour the egg mixture over the dough-covered filling, distributing it evenly. Cover the dish with aluminum foil.
    • Bake for 30 minutes while covered, then remove the foil and continue baking for an additional 15 to 20 minutes until the top is golden and set.
    • Allow to cool slightly before slicing into squares for serving.

    Notes

    Feel free to substitute or add meats according to preference.
    Pepperoncini or banana peppers can be included for added tang.
  • Samoa Truffles

    Samoa Truffles

    If you’re craving the sweet magic of Samoa Girl Scout Cookies, this Samoa Truffles recipe delivers all the indulgent flavors without the cookies. Each bite is chewy, rich, and full of caramel-coconut bliss.

    Perfect for gifting or party platters, these truffles blend creamy caramel, toasted coconut, and dark chocolate into irresistible bites of homemade candy perfection.

    Main Ingredients That Make Samoa Truffles Shine

    • Sweetened shredded coconut – Toasted to golden perfection, it brings nutty depth and classic Samoa cookie flavor.
    • Dulce de leche – Thick, velvety caramel that binds everything together with rich, luxurious sweetness.
    • Sweetened condensed milk – Adds creamy texture and boosts the caramel flavor with a smooth, sweet finish.
    • Crushed Nilla Wafers – The buttery, vanilla-scented base that adds structure and a soft cookie crumble texture.
    • Dark chocolate wafers – Ghirardelli’s silky chocolate gives a glossy coating and bold contrast to the sweet filling.

    How to Make Samoa Truffles (No Baking Experience Needed!)

    Start by toasting your coconut in the oven until it’s golden and fragrant—this is where the flavor really deepens. Mix the toasted coconut with crushed vanilla wafers, creamy dulce de leche, and condensed milk until sticky and thick.

    Scoop the mixture into small truffle balls and freeze them to set. While they chill, melt dark chocolate wafers until smooth. Dip each truffle bottom in chocolate, then finish with a gorgeous chocolate drizzle over the top.

    These bite-sized candies look like they came from a high-end confection shop—but they’re super easy to make at home.

    Sweet Tips & Variations to Savor Every Bite

    For a deeper roasted coconut flavor, let the coconut toast until it’s just shy of dark brown—but stir every few minutes to avoid burning. If you want a slightly firmer bite, reduce the sweetened condensed milk by a few tablespoons.

    Feeling adventurous? Swap the Nilla Wafers for shortbread cookie crumbs for even more buttery richness. Or add a pinch of sea salt on top after the chocolate drizzle for a salted caramel twist.

    If you can’t find chocolate wafers, semisweet or dark chocolate chips melt just fine—just add a teaspoon of coconut oil for a smoother consistency.

    Keeping Samoa Truffles Fresh and Fabulous

    Store your Samoa Truffles in an airtight container in the fridge, where they’ll stay fresh for up to two weeks. Planning ahead? Freeze them for up to three months. Let them sit at room temperature for 5–10 minutes before serving for the perfect chewy texture.

    They’re the kind of treat that disappears fast—so stash a secret stash if you want any for yourself!

    Samoa Truffles

    Inspired by the beloved Samoa (or Caramel deLites) Girl Scout Cookies, these indulgent truffles are a rich blend of toasted coconut, caramel, and dark chocolate. This no-bake treat captures all the signature flavors without requiring the original cookies.
    Prep Time 5 minutes
    Cook Time 15 minutes
    Chill time 30 minutes
    Total Time 50 minutes

    Ingredients
      

    • 1 can 14 oz sweetened condensed milk
    • 7 oz sweetened shredded coconut
    • 1 can 14 oz dulce de leche
    • 1 box 11 oz, approx. 2 cups crushed Nilla Wafer cookies, finely crushed
    • 16 oz Ghirardelli dark chocolate melting wafers

    Instructions
     

    • Spread the shredded coconut in an even layer across a large baking sheet and place in a preheated 350°F oven. Toast for 10 to 15 minutes, stirring every 5 minutes, until lightly golden. Remove from the oven and allow to cool slightly.
    • In a mixing bowl, thoroughly blend the toasted coconut with the dulce de leche, sweetened condensed milk, and crushed Nilla Wafers until evenly incorporated.
    • Line another baking sheet with parchment paper. Using a tablespoon-sized scoop, portion out the mixture and form into rounded mounds on the lined sheet. Repeat until all the mixture is used. Transfer the sheet to the freezer and chill the truffles for about 30 minutes until firm.
    • Following the instructions on the package, melt the dark chocolate wafers, typically requiring about 1½ minutes in the microwave, stirring at 30-second intervals.
    • Dip the base of each chilled truffle into the melted chocolate and return to the parchment-lined tray.
    • Pour the remaining melted chocolate into a small resealable plastic bag, snip off a tiny corner, and drizzle the chocolate over the tops of the truffles for a decorative finish.
    • Store the completed truffles in an airtight container in the refrigerator or freezer, depending on preference.

    Notes

    Ensure the use of canned dulce de leche, not regular caramel sauce, for the correct texture and consistency. If melting wafers are unavailable, dark or semi-sweet chocolate chips may be substituted. These truffles remain fresh for up to 2 weeks when refrigerated and can be frozen for up to 3 months.